Showing posts with label card. Show all posts

Monday, February 27, 2012

Pinterest Weekend Round-up

Love me some Pinterest. Here are some goodies I found this weekend:

Grocery bag journal tutorial

Roasted green beans and mushrooms recipe

Here's a simple hair style I may actually be able to do, and it's called The Starlet!

I found this cute card on a friend's board. The tutorial is for the bow, but I loved the panels with the circle cut-out.


As Spring gets closer, I have been contemplating a compost bin. This one looks do-able.

Love this giant flower stencil - think it would work on concrete?


Sunday, June 19, 2011

Enjoy the Little Things...A Father's Day Card

Happy Father's Day to all the dads out there!
This is the card I made for my own dad and father-in-law.
Thought it was such a nice sentiment, and perfect, subtle colors.


Papers- From the June Scrap-tastic kit
Stamp- Unity
Lace- Prima
Ink- Palette Burnt Umber
CM corner rounder
Adhesive- Helmar adhesive runner, 450 Quick Dry, and ZapDots


And a little help from a SplitCoast Stampers sketch!

Wednesday, May 11, 2011

Sanded Letters Tutorial

If you're anything like me, you have a ton of leftover chipboard and sticker letters. What to do? Here is a technique that you can use, no matter what color your leftovers are!

Start by adhering your shape to your work surface or scrap of cardstock. Temporary adhesive is fine. You can use either chipboard or thick stickers, but it must have a smooth surface- no glitter!
Next, lay a piece of paper over your shape. Thin, white-cored paper works best. Use a nail file to gently sand along the edges of your shape that is underneath your paper.

The result will look like this:

And here is a card I made using the above sanded number:

Card Supplies:
Patterned Paper: Bella Blvd.
Stamp: Bella Blvd.
Misc. green and aqua paper
Ink: Cool Caribbean
Adhesive: Helmar Adhesive Runner and ZapDots
Sketch from SplitCoast Stampers:


Sunday, May 8, 2011

Happy Mother's Day!

Today I am happy to be celebrating with my family at a cookout.
Here are the variety of cards I made for all the moms in my life!


Sketch from SplitCoast Stampers, which I rotated to fit my needs:

Hope you are enjoying your day! Check back tomorrow for my 
Project 365 post!

Friday, April 8, 2011

Celebrate 60- A Card

Today is my Dad's 60th birthday. We had a surprise party for him last week, and this is the card I made:

Supplies:
Paper- Colorbok "Friendly Forest"
CS- Creative Memories
Glimmer Mist- Electric Blue and Coffee Shop
Ink: Chocolate Chip (SU!)
Stamps- "All About U" (SU!)
AC Thickers
Creative Memories circle punch
Adhesives: Helmar 450 Quick Dry and Liquid Scrap Dots

I also used this sketch from SplitCoastStampers:


Tuesday, March 15, 2011

Helmar USA Design Guest Designer Submission

I was recently introduced to Helmar Adhesives through the awesome chicks at Scrap-Tastic. It was love at first sight! Here are some projects I have created using some of their great products:

Project 1: Button Storage Bottle
What I used:
Glass bottle
Paper- Prima and Creative Memories
Rock Candy Crackle Paint from Ranger
Worn Lipstick Distress Ink from Tim Holtz
Misc. ribbon
Acrylic sealer
Border punch- Martha Stewart
Adhesive- Helmar 450 Quick Dry (works like a dream on slick surfaces like glass and plastic)

What I did:
1. Wash bottle thoroughly, removing label and old adhesive
2. Cut paper strips. Here I used one 2 1/2 inches wide and one that was 1 inch wide.
3. Punch border on thinner strip and ink edges.
4. Adhere paper with Helmar 450.
5. Cover entire bottle with crackle paint and let dry.
6. Sponge bottle in random places with ink.
7. Apply a light spray of acrylic sealer and let dry.
8. Tie ribbon around neck of bottle.

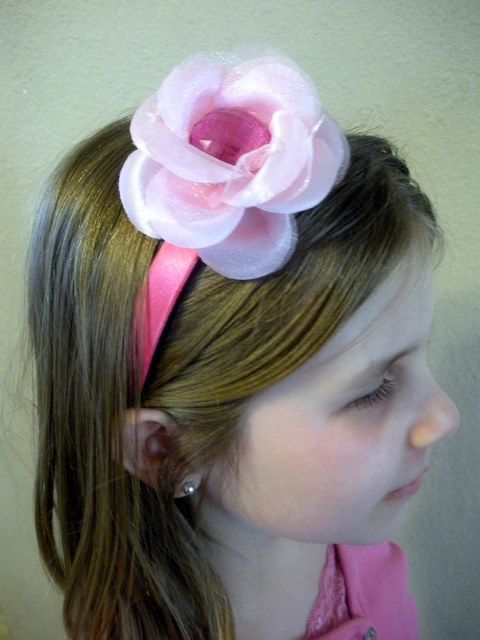
Project 2: Flower Headband
 This project began life as an old headband my kids didn't wear anymore, a large plastic bead, and a broken flower pin. Here's my daughter modeling the finished product:
What I used:
old headband
bead
fabric flower
Adhesives: Helmar 450 Quick Dry and Helmar Liquid Scrap Dots

What I did:
 1. Remove existing bow and residual adhesive from headband.
2. Remove center from flower.
3. Adhere large button to flower center. The flower was deep, so I needed a thick, dimensional adhesive. Scrap Dots to the rescue! Let dry.
4. Adhere flower to headband in desired location with Helmar 450 Quick Dry.

Project 3: "8 Years Old" Layout
 What I used:
Paper- Mooch collection from Urban Lily  (#1- Hyperactive; #2- Sugarhigh) and Bazzil cardstock
Alphas- AC Thickers and Creative Memories
Glimmer Mist- Electric Blue, Red Velvet, and Tiger Lily
Adhesives-Helmar Adhesive Runner and ZapDots

What I did:
1. Cut small circle from patterned paper #1 and spray with Glimmer Mist. Let dry.
2. Position and adhere large square of patterned paper #1 in upper left corner of base cardstock. 
3. Place small circle back in original position and adhere with dimensional ZapDots.
4. Cut large circles from second patterned paper #2. Distress edges and spray with Glimmer Mist. Let dry, then adhere on page.
5. Crop and mat photos.
6. Adhere photos on page. Add dimension to one with ZapDots.
7. Adhere alpha stickers to create title.

Here are some photos that show off the dimension a little better:


Project 4: "Happy" Card
 What I used:
black, white and orange cardstock
Patterned paper- Urban Cuts by Urban Lily
Tiger Lily Glimmer Mist
All About U stamps- Stampin Up
Ink- Staz On Jet Black
Slot punch from Provo Craft
Misc. ribbon
Adhesives- Helmar Adhesive Runner and ZapDots

What I did:
1. Cut black and white cardstock to size.
2. Cut out "h" from Urban Cuts Alphabet paper.
3. Adhere "h" to orange cardstock.
4. Spray white cardstock with Tiger Lily Glimmer Mist and let dry.
5. Punch 2 slots in white cardstock and thread ribbon through.
6. Adhere orange block with the "h" to the white cardstock.
7. Stamp "happy" with black ink.
8. Adhere white cardstock to the black base with ZapDots. The dimension allows for the bulk of the ribbon under the white cardstock.


I hope you enjoyed a sampling of the various uses for Helmar Adhesives. Check out their blog here. My preferred distributor is Scrap-Tastic. Friendly and speedy service!

Saturday, February 5, 2011

Burlap Valentines

I rescued a piece of burlap from the trash and cut out some hearts...added some paint, or a button, or Glimmer Mist...inked up my Unity stamps...and made some Valentine's Day cards!

Thursday, September 30, 2010

Love You Card

Today is my 10th wedding anniversary. Our celebrations will be kept to a minimum, given my husband's current health condition, but it is a very special day nonetheless. 

Ten years of love, laughter, mistakes, learning and growing. Two beautiful children. 
I would do it all again in a heartbeat.

Wednesday, July 28, 2010

You Go Girl!

Today I'm sharing my last project for Linday's Stamp Stuff. I want to thank Lindsay and all the design team girls for being so encouraging and supportive. It's been great!

Today I am using It's a Girl Thing. So, so cute.


I am also using Mojo Monday sketch 149. So, so cute.


Be sure to visit Lindsay's blog for a link to the other design team members and this week's freebie!

Check out Expect Moore next week- a week's worth of Pocket Projects! I am doing a guest post on Thursday showing how to use a hidden pocket on a scrapbook page for pull-out journaling!

Thursday, July 22, 2010

Steampunk Birthday Card

It's time for another project with Lindsay's Stamp Stuff. I made this birthday card using her Steampunk Stamps.  I also used SplitcoastStampers sketch 288 for inspiration. My nesties, glimmer mist and scrap pile came together on this quick card.


Be sure to check out Lindsay's blog for links to the other design team members and today's freebie. Visit her mygrafico store for tons of digi stamps, papers and SVG files!

Thursday, July 1, 2010

LSS- Thinking of You

I can't believe it is time for another project with Lindsay's Stamp Stuff. It's July 1st- this summer is just flying by!

Today I want to share a card I made for my grandfather, who is having surgery on his lung on July 12th. I wanted to create a card that was simple and strong, yet meaningful.  Leaf Prints and All Around Sayings (oldies but goodies) seemed to pair up nicely. I simply layered them in Microsoft Word then printed it out!


(You can really see the shine here)

Supplies:
Stamps: Leaf Prints and All Around Phrases (Lindsay's Stamp Stuff)
CS: kraft, olive
PP: Pixie Press
Ink: Staz On Black
Glitter: PK Glitz ultrafine artist glitter (awesome stuff)
ribbon: Unk
CM cutting system


Be sure to visit Lindsay's blog for a link to the other DT member's projects and this week's freebie. Check out all the awesome (instant) stamps, papers and SVG files at her mygrafico store.

Thanks for stopping by!

Thursday, June 24, 2010

Summer Strawberries with LSS

Lindsay has a cute new set, perfect for summer cards and layouts!


I used this set and Mojo Monday sketch 144 to make this card.


Supplies:
digi stamp- Strawberries and Watermelon by Linday's Stamp Stuff
cardstock: kraft, black, white, red, teal
Swiss Dots embossing folder
Marvy tab punch
colored pencils
red ribbon
black Sharpie


Be sure to stop by Lindsay's blog for links to the other DT members and the weekly freebie.  Also check out her mygrafico store for instant downloads of awesome digi images!

Thursday, June 17, 2010

Happy Father's Day with LSS!


Father's Day is this coming Sunday...have you made your cards yet?? I have, with a little help from Linday's Stamp Stuff! I thought the sentiment was perfect for those great dads out there who serve as role models for their children.


Supplies:
Uptown Houndstooth paper from Lindsay's Stamp Stuff
tree stamp- Unity
Glimmer Mist
ink- SU Chocolate Chip and Wild Wasabi
blender pen
CM Custom Cutting System

Challenges:
Splitcoast Stampers sketch 284
Northridge Media Card Blog- Father's Day
Crafty Cardmakers- Cards for Men
A Crafty Little Place- One for the Boys
Creative Craft Challenges- For the Man in Your Life
Drunken Stampers- Father's Day
Paper Cutz- Father's Day
Pear Tree Designs- Father's Day

(notice a theme here?)

Please visit Lindsay's blog for a freebie and links to all the other DT members.

Also check out her mygrafico store- you will find images perfect for the man in your life, and you can download them instantly!


Saturday, June 12, 2010

Mojo Father's Day card

It's been a long time since I've done a Mojo Monday sketch! I had fun with this one:


Here's my take on the sketch:


Supplies:
sketch: Mojo 142
paper: Pink Paislee (Scrap-tastic June kit)
stamps: Unity So-and-so Loves and EcoChic
ink: Chocolate Chip, Wild Wasabi
CM custom cutting system
ribbon
foam adhesive
computer-generated sentiment

Wednesday, May 12, 2010

You're invited to a tea party!

Ok, maybe you're not invited, but six little girls are! My youngest daughter is turning 5 and we are celebrating with a backyard tea party. I turned to Lindsay's Stamp Stuff Teariffic set and coordinating freebie tea pot to make the invites and Viv's card.

This is the card I made for my daughter. I did some paper piecing using some cute patterned paper from Creative Memories and Worn Lipstick distress ink.


Supplies:
Teariffic digi stamp set
nesties
crocheted lace trim
distress ink
stickles
foam adhesive
sketch challenge: Taylored Expressions #112
color challenge: Craft Your Passion (pink and green)


Here are the invitations. I used the teapot freebie and put the sentiment inside:
"You are cordially invited to afternoon tea, to celebrate my 5th birthday with me!"


Supplies:
LSS teapot digi stamp
glimmer mist
Fiskars decorative corner punch
CM micro punch
stickles

Now head over to Lindsay's blog for a freebie and links to the other Design Team member's creations. Check out Lindsay's store to see all her great images!


Thursday, May 6, 2010

Thursdays with Lindsay's Stamp Stuff


Here's another Mother's Day Card I made using Doodle Flowers. After coloring portions of the image with Sharpies, I covered it with Ranger's Distress Crackle Paint. After that dried I rubbed Tea Dye ink over it to enhance the cracks.


Supplies:
sentiment- Unity
blue & cream CS
Tea Dye Distress Ink
Ranger Rock Candy Crackle Paint
ribbon

Be sure to stop by Lindsay's blog for links to the other design team member's projects!

Thursday, April 29, 2010

Thursdays with Lindsay's Stamp Stuff: Mother's Day Card

I am beginning to work on Mother's Day cards- it's just around the corner! So I grabbed an image from my fave LSS set, Doodle Flowers.  I colored it wth various Tim Hotlz Distress Inks, cut it out, and used it as an element in Card Sketch 276 at SplitcoastStampers.  Here is the original sketch:


And here it what I did with it!


Supplies:
Doodle Flowers from Lindsay's Stamp Stuff
Fired Brick distress ink
Tattered Rose distress ink
Worn Lipstick distress ink
Peeled Paint distress ink
patterned paper: DCWV
misc. eyelets
foam adhesive

Hop on over to Lindsay's blog for a link to all the other Design Team members, and be sure to look for a goodie while you're there!
Her complete line of digi stamps can be found at mygrafico.


Thursday, April 8, 2010

Thursdays with Lindsay's Stamp Stuff


I'll talk about the Hop, Shop & Crop a little later. Here's today's project, a card I made for my Dad. He's a real tool nut, so perfect, huh?

To make this extra easy I colored the image straight from my
computer using Microsoft Paint, then printed.


Supplies:
Tool image from Lindsay's Stamp Stuff
sketch- SC273 from SplitcoastStampers
twill tape (colored with yellow Sharpie to match!)
paper/cs- scraps
staples
foam adhesive
CM custom cutting system

Now on to the Hop, Shop & Crop celebrating the one year anniversary of Lindsay's Stamp Stuff--- April 13, 14, and 15 Lindsay will host a blog hop with all of her designers showcasing special projects. She will have sales and give-a-ways on her blog, and classes and a virtual crop in the mygrafico crop room!

Everything will be free and fun! Check out my post here for details on how to join.

Thursday, March 25, 2010

Thursdays with Lindsay's Stamp Stuff

This week I have two cards for you, both using the Pretty Princess digital stamp set from Lindsay's Stamp Stuff.

Other supplies:
misc. cardstock
Prismacolor pencils
odorless mineral spirits
Nesties Labels 3
white and silver ribbon
Stickles


Other supplies:
misc. cardstock
Prismacolor pencils
odorless mineral spirits
Fiskars border punch
Studio 18 rhinestones
Stickles

Be sure to check out Lindsay's blog for a freebie and stop by her store to see all her great stamps!

Tuesday, March 16, 2010

Happy Birthday to my Hubs!

Yep, today is Justin's birthday. Here is the card I made for him:
I used SC270  from SplitCoastStampers for the layout. I chose a monochromatic scheme from my scraps pile, mainly because I have trouble picking out colors for guy cards! After edging each panel in white I lighly sponged Soft Sky on the image panel. The main image and sentiment, both from Unity, are stamped in Staz On Black. I rounded one corner of the card base and image panel for interest. A little black ribbon to tie it all together, and done! This came together nice and quickly.

Be sure to stop by on Thursday for a new scrapbook page using images from Lindsay's Stamp Stuff!